Last update: Apr 5, 2026 (previously 2010!)
Webpage maintained by
Alan Silverstein,
ajs@frii.com.
Thanks for input to: David Herberg, Roger Parmenter, Perry Scott, Greg
Layton.
Note: I sold my share of the houseboat in November, 2010, so this webpage is effectively frozen as of that time.
Note: After finishing this webpage I discovered a related webpage with a similar title and overlapping content, although his is much shorter, which might be a good thing...
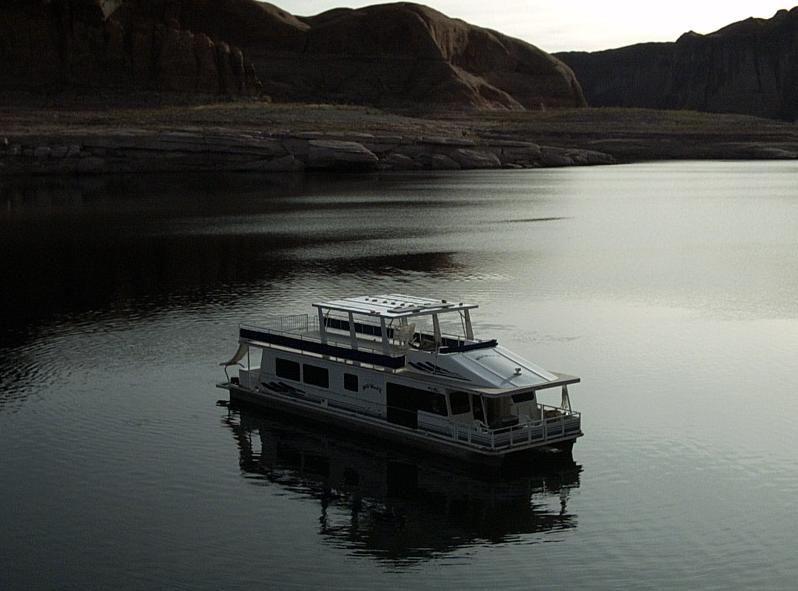
This webpage exists to distill and gather in one place miscellaneous "good advice" on vacation houseboating in general, and in particular about operating at Lake Powell, Utah, USA on the Wildwind II based at Bullfrog Marina buoy 501. (The Wildwind II was built in 2001 by Destination Yachts to replace the aging Wildwind I born in 1986.)
This webpage is "must" reading for new owners/operators of the Wildwind. Parts might be useful as a reference for seasoned captains, and parts might be of some interest to owners of other boats and/or on other lakes. In any case, I aim for this to be as educational, entertaining, complete yet brief, and humorous as possible.
Disclaimer: This webpage contains advice, not gospel. It's based on my 15 years and 216 nights on Lake Powell (as of Aug 2005), but I still learn new wisdom on every trip. (Hopefully faster than I forget the old wisdumb.) "Experience is proportional to equipment ruined..."
Contributions: If you have corrections or additions to this page, I prefer minimal flat text by email. Indicate if you want to be credited by name and email address, name only, or remain anonymous.
Other material: I have online but mostly not on-web a number of other personal files related to running Lake Powell houseboat trips. Here's one example -- a crew "orientation reminder". .
Contents of this section:
Driving a houseboat is a lot of fun... Slow but massive... Until you bend metal. Avoiding bent metal and hurt feelings is the goal of the following advice.
I observe there are two levels of skill in boat driving:
|
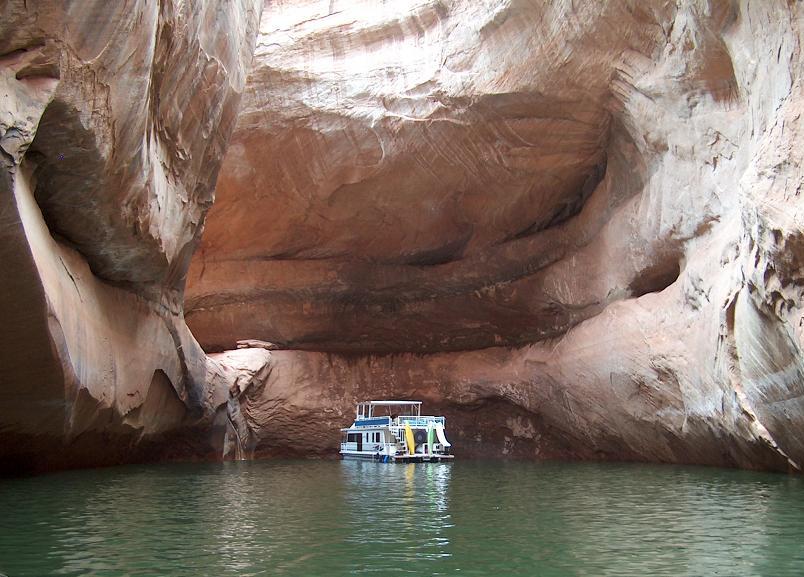
For example, see the nearby photo (by Valerie Scott) of the Wildwind II in the Cathedral in the Desert (Clear Creek Canyon, Escalante) when the lake was down about 124' and the water was about 25' deep in the Cathedral. The boat is 62' long and 16' wide. Those are a pair of kayaks standing on the back deck. You can barely see the waterfall to the left, about 25' high at that point. |
Here's what I can tell you about both kinds of driving -- assuming a twin-pontoon houseboat with one outboard engine at each rear corner, a fairly standard configuration at Lake Powell, although some boats are mono-hulls.
Turn the key and watch the tach. Push in the key to add choke only if necessary in cold weather with cold engines. Beware being so macho about this that you damage the keys or the ignition switches... The engine can't tell how hard you are pressing on the key. Let go when the engine seems to hold about 1000 RPM. If an engine doesn't start, wait a moment for the starter and engine to stop turning before you try again.
Note: It's very nice to have a GPS unit at the helm to watch your speed, direction, time until sunset, etc.
So how do you stop a right turn? It doesn't matter if the front or the back is swinging right, you turn the wheel left -- very simple. When pinning you can steer and hold your angle by looking only out the back... In fact that's preferable.
Of course all of this is for fine-tuning, when driving in open water you mostly look ahead! But to trim up the steering so the boat is, at least for a while, going in a straight line: Look backwards out the door, or at reflections.
If you watch your wake and find you're "wagging your tail", try using this trick to trim the boat straighter. (If you're holding a wake and the tail-wagging results from alcohol, leave the driving to someone else.)
A common question is, "why isn't there an indicator on the dashboard to tell me the direction my engines are pointing?" The steering is hydraulic, which means any indicator wouldn't stay aligned. We've toyed with putting a webcam on the stern and a small display on the helm...
With the throttles in neutral, turn the wheel all the way in the direction you want the boat to spin. Put the "outside" engine of the turn in forward and the other engine in reverse. For example, to pivot right, turn right and put the left engine in forward. Usually it takes a lot of reverse and only a little forward to hold position while turning. Carefully balance the engine RPMs by watching out the window for bubbles, twigs, scum, dead fish, etc, so you can tell if you are moving forward or backward.
Note: To start a turn from a dead stop without building up much forward momentum, try turning the wheel to the limit and "goosing" one of the engines up to full RPMs briefly, just a couple of seconds. Then go back to neutral, relax, and watch the boat swing.
By the way, in my experience correct nautical lingo such as: starboard, port, bow, stern, galley, head, and keel-haul, are fine and fun to use, but generally should be avoided on self-crewed pleasure craft with inexperienced crews. Any more I'm just as likely to say: right, left, front, back, kitchen, bathroom, and flog, to avoid confusion.
Note: The smart throttle system should automatically prevent you from damaging the lower units by switching forward/reverse too quickly. But it also introduces a bit of lag time you must anticipate.
Note: To rev up the engines while in neutral, which is rarely needed, press the hidden button (on the lower center of the throttle box) once and then advance the levers. In this mode each engine's LED stays green rather than yellow. To re-engage gears you must go to neutral and press the button again. It can be very confusing later if you forget to undo this mode when you are done with it...
Note: The fronts of the pontoons are reasonably armored to allow pressing the boat up against rocks.
After you get comfortable doing this you'll find it easy to moor in places you would otherwise never think possible. So long as you can drive in and out safely -- at an angle -- you can swing the rear end around into place, and back out later. I have parked in scenic spots with cottonwood tree stumps or big boulders literally a couple of feet behind my engines. (See above about spotters... grin)
Note: The steering wheels are independent, turning one does not turn the other, but both wheels work at any time to control the engines. It's very bad form to turn the wheel and confuse the PIC (pilot in command) while you're at the inactive helm.
No worries, if you foul a prop with a line the engine is likely to stall itself anyway, in which case the throttle lights blink. "You know you have landed gear-up when it takes full power to taxi."
Taking a big wave sideways can really rock the boat, opening doors and drawers, even tossing people and other objects off the top deck. "How to sink a ski boat in one easy wake" -- especially if it has a low bow. (Crossing a big wave head-on is not quite so bad except when the wave washes everything off your bow and then runs through the open front door into the living room.)
If you can't set the angle fast enough, without hesitation warn the crew, "Big wave coming, hang on!"
I observe that newbies at the helm take a while to foresee and react to this common situation. But even after they anticipate it they tend to oversteer, turning too hard and long into the wave and then overshooting back out of it. With some practice you can learn to adjust for incoming wakes so gracefully the rest of the crew hardly notices -- even if they are sober.
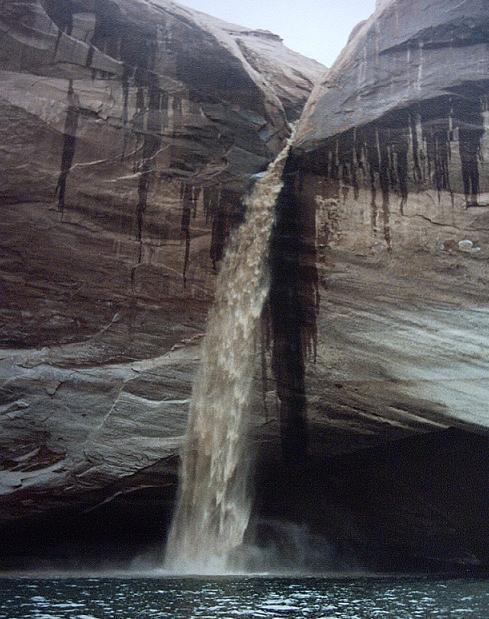
However, in case of heavy rain likely to end before sunset, it's great
to be moored somewhere so you can jump in a ski boat and go out hunting
the rare, fabulous flash flood waterfalls of Glen Canyon.
Little boats and other big boats:
Each little boat has a 20-50' floating line attached to its tow point. (Floating usually means polypropylene, not nylon. Warning: Even floating lines can still be sucked into a prop when you reverse.) Whenever the little boat is off on its own, this tow line is brought aboard it -- one end still tied up front, the rest of the line cleated or tied inside the boat and the loose end dumped on the floor.
For towing, the free end of this tow line is either tied to a hefty anchor clip which is then attached to a tow point at the stern of the houseboat, or else we just tie it directly to a tow point on the houseboat with a bowline ("bo-len") knot each time it goes on tow. In the latter case we don't bother to safety the bowline with an additional knot since it's pretty much under constant tension and not subject to coming loose. (A bowline is an ideal knot you should know for this purpose. It holds fast under great tension, yet can always be undone later. Don't waste your time tying a Windsor, grin...)
If you have two (or more!) little boats, tie them as far apart as possible, and consider using tow lines of radically different lengths to minimize potential interference. The Wildwind's outer rear corners are just hefty metal bars, but you might be able to find some short rope loops laying around that we made from anchor line, and attach them "through themselves" at the corners to use as tow attachment points.
We've also learned to tie a pair of short light lines to the sides of the houseboat, dragging in the water but too short to reach the prop(!) The forward one of these lines can be tied through the center hole of a big cleat, or attached to the smaller cleats added in 2003. These short lines make it quick and simple to tie up a little boat. It comes up alongside, lifting and going under the rear anchor line if the houseboat is moored, then people at the front and back of the little boat grab the dangling but ready "permanent" lines and tie them to the cleats on the little boat.
"Go to neutral" is the command from the stern when they're ready to pull in the tow line, untie it, and step aboard the ski boat. "We're clear" (or sight of the ski boat vanishing at warp eight) means it's time to resume lumbering along in the houseboat. I suggest to my ski boat drivers that they stay ahead of the houseboat at all times in case their engine dies and they need to be picked up.
When a little boat returns, they cruise by the helm window making a tie-up motion or call on the radio, "go to neutral." After the ski boat is vacated, its engine trimmed up for minimum drag, and it's tied up for towing, the call from the stern is, "idle up" -- to gently take out the slack on the tow line. (In windy conditions we might idle along continuously while doing this transfer.) Finally when the line is taut, the call from the rear is, "hit it!"
Observe that you can tell accurately from far away in which direction another houseboat is aiming, even when it's so far off you can't be sure if it's approaching or departing. Similarly, when you are on the helm navigating through a thicket of boats of different sizes, speeds, and directions, you can indicate your intentions simply by turning the houseboat. This is especially good to know when you're aiming nearly head-on to an approaching boat in the instance. Pick a side and make an obvious turn to that side. If the other captain is observant and nice about it they'll answer with the opposite turn, quickly establishing the mutual plan of passage.
Contents of this section:
After many trips in varying seasons and conditions we've refined mooring site (campsite) selection to a fine art.
Sometimes we send a ski boat ahead with a volunteer "scouting party" and a marine radio. In that case "the scouting party is the final authority" on site selection. Don't waste time on the radio having them relay parameters back to the houseboat for a remote decision. You really must be at the spot to tell what's good and what's not. I'm happy to overhear what they are seeing, their debate between "sites A, B, and C," and precise directions to the site of their choice, but I cannot determine by radio if site A or B is superior.
After many years we've gotten lazier and often just scout from the houseboat directly. ("Crew powwow! Tag, you're all now members of the scouting party! Where do you want to stay tonight?") This can be more time-consuming and frustrating, but we're all on vacation, right? Note: It helps to keep binoculars at the helm for this and other purposes.
Any of the following criteria might be relevant while hunting for a mooring spot for one or more nights:
You must find some sort of anchoring potential on shore. Until they invent the JATO (jet-assisted take-off), frangible-link (explosive separation bolt) anchor, you can't moor alongside sheer cliffs. (Just kidding. We know the Park Service would frown on this, and so would we. It's just an alcohol-aided fantasy we dreamed up one evening after particularly difficult anchoring in windy conditions.)
In 2005 I finally learned yet another trick: Place the business end of the rear anchor line(s) as far up the hill as possible so it's easier to slip a ski boat underneath it/them to tie up alongside (against fenders).
It seems a lot of people greatly prefer sandy beaches, but I don't. Usually they don't make for great anchoring, the sand can blow around and be tracked aboard, often there's more vegetation and gnats, etc. Give me instead a "sweet spot" with pretty scenery, deep water close to shore, low-angle rocky flats, and a few well-placed "bombproof" boulders.
As captain it's your responsibility to know how long remains until you'd better be moored, and to have some primary and backup anchoring sites in mind if it's getting late. As I've gained experience I've gotten more comfortable with pushing this limit, but I really want at least one solid anchor out on each side before I need a headlamp.
All of the above suggests that site selection is difficult and limiting. Yet I calculate that in 226 nights on the lake I moored the boat in 162 different spots. Certainly some sites were very sweet while others were merely adequate, but the point is that it's a huge lake with thousands of miles of shoreline and lots of fine choices.
All four anchors on the Wildwind II are 22-pound Danforths with two "fangs" and a center "tang", designed for drag-anchoring on a muddy ocean or lake bottom, and later raising by pulling straight up over them. Of course that's not how we use them at Lake Powell where the waterways are narrow and the bottoms are complex. We carry the anchors ashore and set them in rocks or sand.
Note: Heavier anchors (like 40-pound) may be desirable for sea anchoring, but at Lake Powell it's not the weight that matters, it's all in the technique, and people can get hurt hauling heavier anchors on loose rocks.
I recommend the following, assuming a houseboat like the Wildwind II with a wide cabin and thus very narrow "mousewalks" and weak handrails on each side...
Another alternative, boat-owner willing and space permitting, is to bring the little boat(s) in from tow to tied-alongside (with fenders) and then largely forget about them while maneuvering (slowly).
The ideal approach is... Lined up about a boat-length out, and you coast in with the engines in neutral. I might use a bit of reverse a few feet out to land gently unless it's a soft, sloping bottom. In rare cases you do run the boat a bit up on a soft, sandy shoreline, say for a temporary daytime stop in calm conditions when people will stay aboard and you'd rather not put out anchors.
Often the anchor line goes around a big boulder and you want the scope (angle) as wide as possible from the boat. This means running the line to the far, or outer, side of the boulder first and setting the anchor on the side closer to the bow.
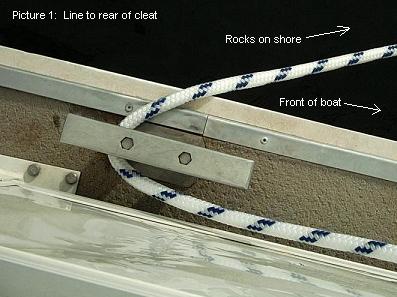
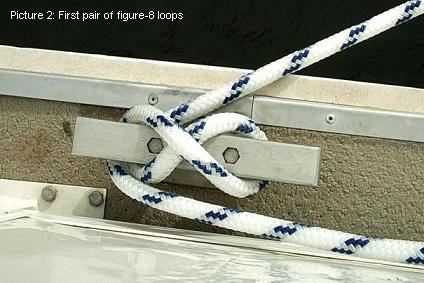
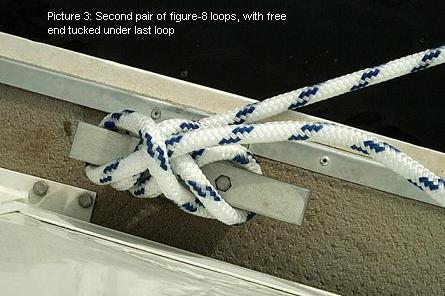
Note: I learned that this method is similar but not identical to a "cleat hitch". The differences are that in a cleat hitch the first loop goes around the base of the cleat rather than crossing over the far ear, and the half hitch is made after the third loop rather than the fourth one, "so that the line is coming away from the cleat from the opposite direction in which it came in."
I'm not sure it matters much. The first wrap around the base versus ear might be a bit stronger on a lightweight cleat, but that's not a problem on the Wildwind II at least. Adding a fourth loop seems reasonable too if there's room on the cleat. However, I could see using either three or four loops as appropriate so the free end leaves the cleat towards the storage bucket, which is between the rear and next-to-rear cleat. This suggests using four loops on the rear cleats (as pictured above), and only three on the next-to-rear cleats. Since they are on the "mousewalk" and hard to reach, fewer loops might be better anyway.
In 2006, someone finally pointed out to me that going around the base of the cleat first means less torque on the cleat itself... So from now on I'll probably do that.
This technique makes it easier to cleat the opposing anchor line... You still want to pull it tight as you comfortably can, but you don't have to fight it so hard to get a good result.
Also ideally if the shoreline is rocky, only one pontoon touches the rock and the other has some water between it and the rock. This prevents bang, bang, bang all night when wind or waves rock the boat.
On the Wildwind II the rear cleats (outboard anchors) are not so bad. The inboard lines, though, must go to cleats that are harder to reach. It's easier to tie them if you can stand in a ski boat fendered alongside. (We have the ski boat(s) come tie up alongside as soon as the outboard anchor lines are cleated and the engines are off. We securely tie three fenders on the side rear of the boat for the week, on both sides if we have two ski boats, such that the fender bottoms just touch the water.)
In lieu of ski boats, try opening a sliding window and screen (by the rear bunks) so you have more to hold onto than just the flimsy handrail. Be careful not to pop the screen out of the slot.
Note: It's been suggested that if there's any risk of the bow of the boat sliding sideways along the shore, you're better off with a line running out perpendicular from the bow than with a second (inboard) 45 degree line. Dunno, I've never had the bow slip along shore myself enough to matter, and I like the security of a second line that can hold the boat into shore on each side.
August 2007: Of course after writing that, I've had the bow slip along shore several times, and I'm more careful now!
I got tired of tightening my anchoring lines each night by hand. My friend installed hand cranks on the upper deck of his boat, to which to attach the anchor lines. This allows him to keep the anchor lines tight by simply going to the top deck and turning the crank a few "clicks". This also allows him to tie up ski boats and PWC to the sides without the lines getting in the way.
For my own (co-owned) houseboat, I purchased two 5-ton "come-alongs" and two large tow straps prior to last year's trip and was very pleased with the result. I wrapped each tow strap around a very large boulder and then attached one end of the come-along to the tow strap and the other to a loop at the end of the anchor line. I then tightened the tow line with the ratcheting motion of the come-along. I could easily tighten these two lines (the rear lines off each side) just before dark. I slept well despite the wind.
In addition I tie a second line on each side to either a boulder or a buried anchor. This year we had two nights of very strong winds and did not budge or rock at all.
From experience I really prefer to tie off my main anchor lines as close to the rear of the houseboat as possible but that, of course, interfers with ski boat docking. So we came up with a novel method to get the line up out of the way, as in these photos:
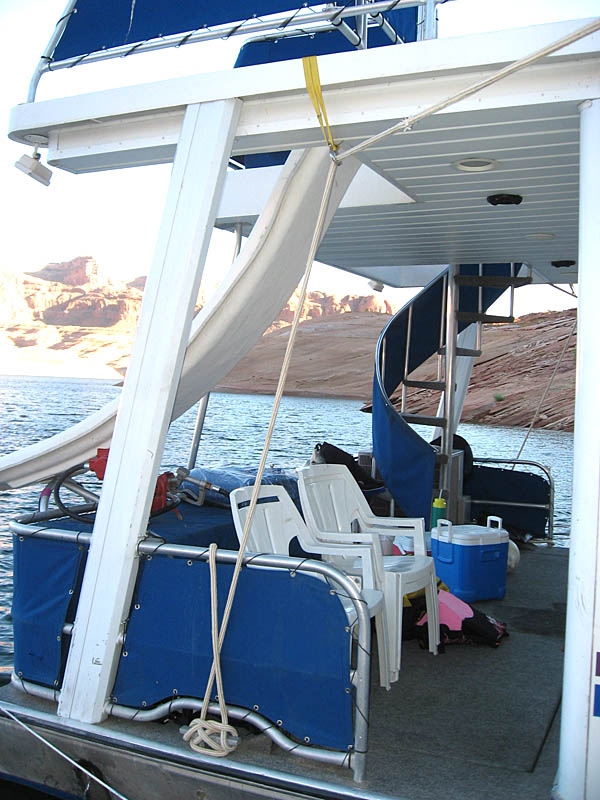

In this case the anchor line comes from the top of a rocky mound, passing through a heavy D-ring on a web loop attached to the upper deck structure. It works just as well for a beach anchor. The roof design on this particular boat (Starlight 75') provides a sturdy and convenient location to place the loop. Other boats might not have such a convenient design. I certainly would not recommend attaching the loop to a railing, flag pole, or lighting fixture.
Though I've never seen anyone else do this, the houseboat seems to be perfectly stable in heavy wind, and I can see no risks or drawbacks to it.
If you pull the gangplank all the way out so it angles down, it has a little more side-to-side freedom but is also most vulnerable to torque, so be careful.
Regarding rodents (and coyotes), in 2008 Phil Clark wrote:
We made some rat barriers out of cheap frisbees and jumper cable clamps...
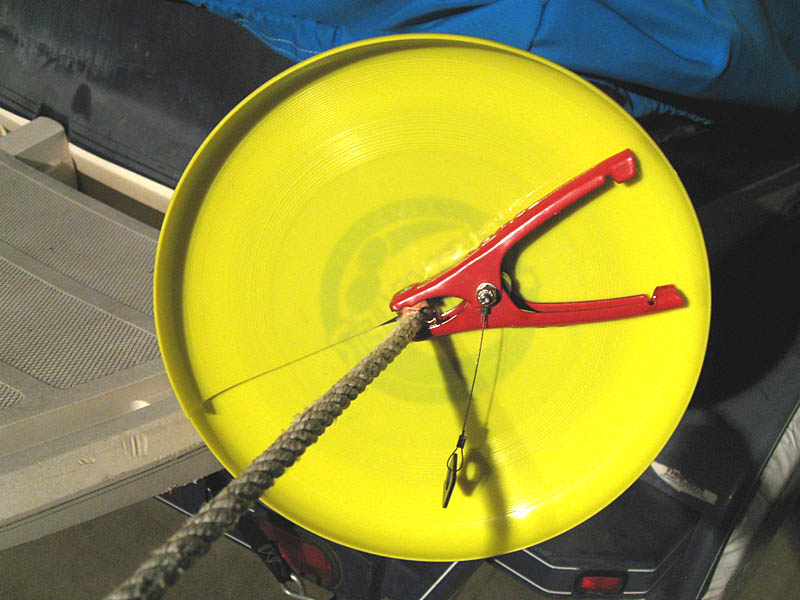
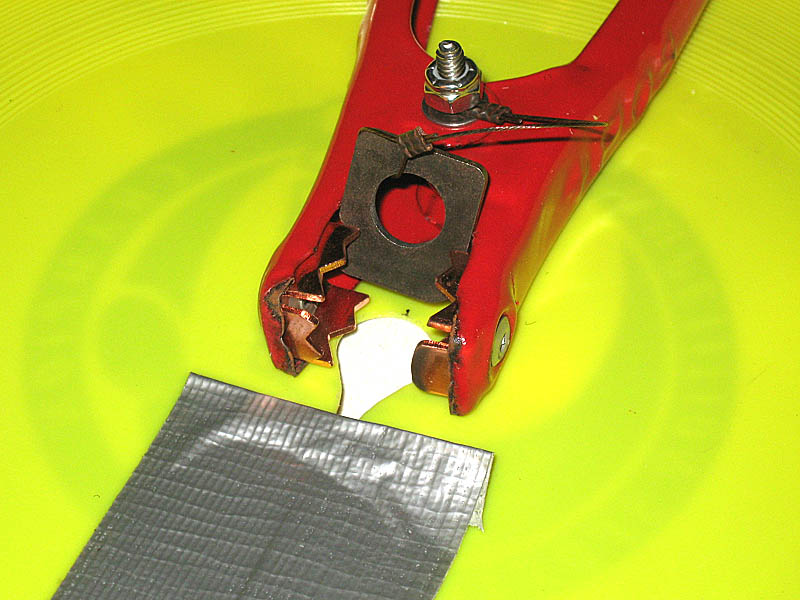
I drilled a 1/2' hole in the center of the frisbee (using a step drill), then cut a radial line from the edge to the hole to let the rope through. The clamp grips onto the rope going thru the hole. Once in place, a piece of duct tape holds the edges of the cut together. The washer on the wire props the jaws open while installing the disk.
They seem to work well -- relatively cheap, waterproof, easy to install and they don't flop over or slide down the line. I have some 11" disks and some 14" disks that keep coyotes off the boat. We don't pick up any coyotes so they must work, I guess.
Reverse the above procedure. If winds are calm or steady and/or the pontoons are solidly grounded, I defer firing up an engine until necessary, before pulling the last (upwind) anchor, or in some ideal cases, not until all anchors and lines are in.
Only after the front person secures the end of the line (now decoupled from the anchor) to a front cleat does the rear person pull in the rest of the slack, dumping it into a bucket, and then flop the line up onto the side of the boat, inboard of the cleats, for travel.
See the related article on this topic.
This is a routine occurrence, don't panic, and be patient. The procedure is as follows...
Note: Never force the limit on the steering wheel. In fact after you find the limit, come off it a little bit to take pressure off the system.
After they get you free, smile and wave to your lost crewmembers as you drift away gracefully and they struggle to free their legs from the knee-deep mud.
I received email from a reader who wrote, and to which I replied, for whatever it's worth to repeat here:
Me and the guys that share the week on our houseboat are sick of trying to figure out how to anchor our ski boats and were wondering if you have any suggestions. So, let me tell you what we have tried so far and the problems that we have had with them. First we tried tying off to the houseboat anchor lines, and until the houseboat attacked the ski boat this was a good idea, it also makes it difficult to adjust the anchor lines. Second we tried tying off to the stern of the houseboat which worked great but it kind of ties up the swim platform, and lastly we tried a separate anchor line that never caught a hold of anything and just kind of drug along the bottom until the boat was ashore (wrong type of anchor?)
Wrong kind of bottom (grin). For example, Danforth-style anchors like we use on the houseboat for boulders on shore are designed for flat, muddy ocean or lake bottoms. Powell is too rocky and irregular, in fact you'd risk trapping an anchor underwater and having to cut it free.
And he also wrote,
This year, if we can't figure anything out we have decided to just drink enough at night that we don't care and wave to our boats as they drift off, and in the morning start the hunt...
After I stopped laughing out loud, I added the following:
Maybe I didn't make it clear that we tie up 1-2 ski boats alongside the rear end of the houseboat (on the sides, not on the back) whenever the houseboat is anchored and they are not in use. To do this we hang 2-3 fenders (usually 3) alongside so their bottoms are at the right height, seems to be just touching the water. Then the ski boat is tied fore and aft to points ahead and behind of it on the houseboat, against the fenders. The fenders remain tied in place all week -- with pains taken to tied them well so they can't come loose and be lost (happens too often).
At least on our houseboat, this makes it pretty easy to get on and off the ski boat while it's tied up, through rear deck side gates. Also it's secure enough except in rare conditions of huge wind/waves, such as on a big open bay. Sometimes we even move the houseboat (slowly) with a ski boat or two tied up this way, such as backing out from shore and turning around, then we put the little boat out on tow for travel. (More often though, the ski boat owner jumps in and motors out of the way to wait while we maneuver.)
Naturally we are careful not to let the houseboat break loose in the wind and swing toward shore crunching a little boat (grin).
Usually at the start of our week we prepare a bow and stern line for each little boat. These lines are left tied to the cleats on the houseboat and dangle in the water ready for use. (The rear line is short enough not to reach the prop.) So when a little boat returns, it's easy for it to come up alongside, with someone in the bow lifting the rear anchor line overhead (so they slip under) and pull in against the fenders by hand, then people at the front and rear of the ski boat tie the prepared lines to the cleats on the ski boat. Very quick and simple.
I've learned to watch for parking the houseboat such that there's room for the ski boat, and no rock/tree hazards. Also a recent refinement is, it's nice if the rear anchor lines can go more uphill (given a choice in a hilly beaching location) so it's easier to slip the ski boat under them.
By the way, I once saw a ski boat owner do a very cute thing to tie up a ski boat in an awkward place (steep slickrock) for a hike/climb we did to the Eye Arch. He tied bow and stern lines to shore, but to keep the ski boat off the rocks (without a fender that might slip out), he hung an anchor over the side, well down into the water, between the boat and shore. This acted like a spring that kept the boat off shore, with some tension on the other two lines. Also it wasn't a windy day.
At the end of each use of the houseboat there are two dock stops required, either at Halls Crossing Marina or Bullfrog Marina, or one at each -- to be avoided if possible as it costs a lot of time to enter both marinas.
Fuel dock:
One stop is the fuel dock for gas and propane. The latter is usually but not always available at the fuel dock. Call ahead on marine channel 16 to ask them (or go directly to Executive Services on channel 10).
Sometimes they say, "we can only swap propane bottles." Avoid this if possible. If you have no other choice, ensure you get back bottles at least as new and good as the ones you lost. We've received "dead" bottles with expired date codes!
At the fuel dock there are permanent tie lines. I recommend tying up along the left side (see below). It's best to be sideways rather than bow-in at the fuel dock for easier filling of rear (engine) tanks -- run the gas hoses across the bow or stern and not down the catwalks (ouch) or through the cabin (yikes!)
Propane: Turn off the propane (both bottles) and the electrical master switch (in the hallway), and close all windows and doors. Disconnect propane tank(s) that need filling and get them out on the dock ASAP as this can take some time. The dock person should haul them from the boat to fill them, and later return them.
Fuel: The keys usually found over the helm should include a gas/sewage cap "key", a black plastic part with two prongs. Fill one to four fuel tanks as needed. The rear (main) tanks are easy to reach, and so is the front (toy) tank on the dock side, but the front tank on the opposite side is tough. For this reason I like to draw from the left toy tank first and avoid the right one if I can. If you must fill the front tank on the outside it's helpful to have a ski boat come up alongside to do it. Attempting to hang off the rail can dump you in the lake where the monster mutant carp will probably eat you.
When the propane bottle(s) return, attach them securely to the hoses. Turn the selector lever to one bottle or the other, open that one, and leave the other closed. (Ensure you have the hoses uncrossed so the selector valve works logically.) Note: In cold weather don't panic if it takes 15 minutes or more for propane pressure to build up and the gauge to show green after opening a bottle.
I tip the fuel dock operator $5 if they are helpful, more if they are cute, I mean, if they save any of my crew from the carp.
Pumpout dock:
The other stop is the pumpout dock for sewage out and fresh water in. Note: There is often fresh water available at the fuel dock too; we have filled up there when it wasn't working at the pumpout dock.
At the pumpout dock you must put the right side by the dock, that's where the outlets are, and you must supply your own tie-up lines, so have them ready. Consider wind direction... It's helpful if the wind pushes you sideways into the dock instead of away from it. Also beware using anything but the end of the dock or the outer slips, as the inner slips are not deep enough -- the water/sewage ports end up out of reach beyond the end of the dock. (Ask me how I discovered this... grin)
Snag (tie to) one end or the other of the boat, take up the slack, and then tie the other end. Be sure the lines work against each other, holding the boat securely, and not in the same direction...
Fresh water can take a while so get it going first. The key to the filler door should be over the helm. Use the garden hose stored in the back closet. It's screwed to itself when stored, to keep the inside clean, please leave it that way. Screw one end onto the "FW" tap on the dock, flush the hose with fresh water into the lake, then stick the open end into the opening under the filler door. Do not screw it into the "shore pressurization" threaded hole, that accomplishes nothing.
Fill until water spurts out of the hole. Check under the front bunk that the main tank is full. Then run the hose in through the rear bunk window and across to the second (smaller) tank under the rear left bunk. The skirt hinges up and can be propped open on a box or something. You can screw the hose into the fill point on the second tank, but keep an eye on it so you don't overfill and blow the tank.
The two tanks are passively connected below the floor, but the water line diameter is so small it takes "forever" to fill one tank from the other... Hence the two separate fill points.
When you're done, drain the water out of the garden hose, coil it up, and screw the ends together before storing it.
Note: One owner thinks the proximity of the fresh water inlet and the sewage outlet is a cross-infection risk. Use your own judgement and do whatever you think is necessary to avoid any tainted water getting into the fresh water tank.
Sewage can also take a surprisingly long time. First turn off the lake water pump (by the sink) and open any cold lakewater tap to depressurize the system. This both saves batteries and makes it possible to look into the rear toilet's hole later with a flashlight.
Pull out a red lakewater hose from the reel on the dock. Run it in through the front stateroom window to the forward bathroom. Open the toilet valve, stick the end of the hose into the hole, let go of the toilet valve, and open the lake water valve on the hose. Start running water into the tank. Add lots of lake water to the tank while flushing. Have someone keep an eye on this end so the hose doesn't come out and spray all over the inside of the boat!
Back outside, if it's available and desired, pull a second red lake water hose out of its reel so it's ready to use to rinse off "whatever".
Now unscrew the metal sewage cap being careful not to lose it. You can put it in your pocket (seriously -- yes you can wash it first). Find a screw-in coupler pipe on the dock, usually at the base of a lamppost. After it's hand-tight, attach the white plastic suck-out hose to it with the side clamps, then use the hose to twist the coupler tighter. Press the start button on the metal box on the dock, pray, open the inline valve on the suction hose by the box, and with any luck you'll get suction for several minutes.
Watch the color of the material going up the hose. If there's no clear section in the hose, put the sun or a flashlight behind it to check. Amuse your crew with crude comments such as, "there goes Mexican night!" When you get a lot of air, turn off the suction hose valve for a while and add more water to the holding tank. Repeat until very clear water goes up the hose, followed by mostly air. Also look down into the rear toilet's hole with a flashlight and ensure you see a clean tank bottom. If necessary move the red lake water hose to the rear toilet after a while. What is "necessary"? You'll know when you see it...
Yes this all sounds pretty icky, but rest assured you'll get used to it and soon you'll be the best sewage sucker on the lake.
Again, it takes a surprisingly long time to suck out all the mess, especially when the pump turns off and you must wait for it to obey the start button again. Please clean out the tank well for the next person. Add some blue toilet chem when you are done.
Unstick the coupler by turning the suction hose a little. Then unclamp the hose and remove it, next unscrew the coupler, and finally replace and tighten the metal sewage cap.
What if there's no lake water available at the pumpout dock? Grab a bucket, tie a rope to the handle, dip it in the lake, and dump water into the toilets... Slower but it works.
At both docks, warn all crew to avoid getting any body parts between the boat and the dock! They can get crushed.
Why moor opposite sides to the different docks? It's much easier to clean the outside windows while standing on a dock. Ask a crew person to take care of this while you are tied up and attending to the fluids. If they moan, "I don't do windows," offer to let them watch the inside flush hose instead...
The docks are relatively easy to find at Halls Crossing, somewhat harder at Bullfrog -- the pumpout dock used to be outside the harbor, by the boat ramp. They get moved around depending on the water level. You'll just have to find them when you need them.
Repeating myself a little to summarize (I do that a lot...) Think and plan ahead. Note which side has the water in/out ports (the starboard side). Also note the length of the boat, there are shorter slips we can't use because the rear end sticks out and you can't reach the fill/dump ports from the dock, and pay attention to the wind direction. The easiest mooring is with the wind pushing you against the dock, on the side with the fill and dump ports, or up your tail. It's much more difficult to work at the water dock when the wind keeps pushing you away from it.
Often these constraints add up to exactly one slip that is just right, and the others suck or are unusable. But at least on Saturday evenings at Halls Crossing we almost never have to wait for that one perfect slip.
Trash and recycling:
There are public dumpsters near the tops of the boat ramps at Bullfrog and Halls Crossing, (usually) along with a cage for recycling aluminum cans. Motor oil and lead-acid batteries can be taken to the gas station at Bullfrog. I don't know of any other recycling dropoffs at the marinas.
We have quieter, fuel-efficient four-stroke engines on the Wildwind II. The old boat (Wildwind I) had noisier, smellier two-stroke engines with an oil mixer. Either way you get to mess with oil sometimes (oh joy).
Oil changes are due every 100 hours, or roughly every 5 weeks at 20 hours/week of typical use. It is very important that we do these changes in a timely manner. Neglected oil leads to expensive engine problems. When the hour meters say it's time, please take charge and get it done, or ensure the owner coming after you will bring what's needed and get it done.
Note: Avoid leaving engine keys in the "on" position when the engines are not running, as this increases the hours incorrectly.
To do an oil change:
Note: If you can't find a suitable oil filter wrench and you are absolutely sure you have in hand a proper replacement filter, it's acceptable to destroy the old filter (bending it with a big wrench) while removing it, and to merely install the new one "hand-tight" -- but very hand-tight in that case, so it cannot work loose.
A houseboat is complicated. It's prone to wear and tear and breakage. You'd be amazed how many problems are logged and addressed each year.
Brief sermon:
What you can do, beyond (obviously) trying to take good care of the boat, is to proactively help keep it well-maintained. This means if you notice a problem, write it down in the ship's log and report it to the maintenance director.
I know you're on vacation, but it would be really cool if you would be even a little more proactive than that. This means:
End of lecture, thanks for listening.
Tools in the lake:
How much did you pay for that left-handed spanner grommet wrench? This might cross your mind as you lean over the gunwale to tighten the boxcar prawn when the water below you is over ten feet deep. (My personal record for retrieving sunglasses is 33', but I had to use a weighted line to get down that far.) Based on personal experience I can recommend tying a string to your tool before using it on the lake. What to do with the other end of the string is pilot discretion. You might tie it to a float of some kind, or to a part of your anatomy.
Rocks on the roof:
The aluminum awning can rattle in strong winds. Bracing was added to reduce this, but some panels still rattle. We keep rocks on them to prevent this. If you hear rattling it means one or more rocks slid off, just replace them.
Cleaning solar panels:
We have observed that they do gather sticky dust. Simply clean them off occasionally for a solar boost.
Reimbursement:
If you spend money on goods or services for maintaining or improving the Wildwind II, please keep your receipts and ask the managing director to reimburse you for your costs.
Contents of this section:
It would be nice to have a drawing, but in lieu of that, here's a written description.
Power comes from three sources:
Batteries are in two places:
In the hallway:
Discussion:
The house batteries go through the circuit breaker panel to lots of destinations. They also go to a 120V inverter in the rear deck closet that feeds the 120V outlets and has its own switch. Not included in these paths are the engines, the helm devices (including especially the marine radio, spotlight, and horn), the refrigerators, and the 12V gas pump on the front deck. There are two self-resetting circuit breakers under the generator cover for the helm and the gas pump.
There's also a hidden switch to disable the gas pump, to avoid having to put a physical lock on it. Ask other owners for the location. Don't use this switch to turn the pump on and off, you'll wear it out.
So, to turn on or off the electrical systems when leaving or arriving at the buoy, use:
Note that the solar panels only feed the house batteries and do not help keep the rear batteries charged over the winter. Fixing this would require some complicated circuitry, involving at least power diodes to prevent the batteries from feeding each other -- so that one dead cell doesn't take them all out.
Also note that the engine alternators don't feed the house batteries. Sometimes people think this is a waste of free power. But actually it's a bad idea to overtax the engine alternators by trying to use them as generators -- there's no such thing as a free lunch -- this would put more strain on the motors. Plus it would also require at least diodes, or some kind of smarter charging circuits. It's probably simpler to just replace all three batteries every three years for about $40 each.
The engines can be trimmed up or down from the helm or by using the trim buttons on the sides of the motor heads. It's best to leave them trimmed all the way down while driving. There is nothing to be gained by raising them, it just wastes energy throwing a bigger wake. If you snorkel underneath you can see how well the engines are hidden behind the pontoons... It's hard to damage them unless you run sideways or backwards into something.
Beware, due to bending of the frame rails around the engines, do not trim them all the way up, you can bend a prop. It's best to do the trimming using the buttons on the engines themselves.
An eye bolt attaches the tongue on the boat to the end of the steel cable on the buoy. This eye bolt can unscrew from the anchor shackle allowing the houseboat to drift in wind through the buoy field! (Serious bent metal on multiple boats.) So use wire (not string) to safety the bolt -- that is, keep it from spinning -- to prevent this from happening. There are pre-formed "safety pins" designed for this purpose, but plain old coat hanger wire is easier to work with and just as effective. The strings, if any, on the shackle and bolt are good to hold so you don't drop any parts in the lake, but they're not sufficient to safety the bolt.
Please store the shackle, bolt, and wire together, say, over the left front window (inside) where they are out of the way but easy to find.
I warn my crew that, "Nothing goes in the toilets but water, human waste, and RV toilet paper. Anything else could clog the works and that's a disaster. Ladies, wrap and trash any used feminine products."
Note: Non-RV TP might be softer but it's not recommended since it, too, can clog the works when you suck out the tanks.
I buy blue RV toilet (holding tank) deodorizing fluid cheap at Walmart and add some every day or two, just a few ounces, more in hot weather if needed (you'll know... grin)
Maybe it's obvious, but given a choice I prefer to do dishes and take showers while underway rather than while moored in a campsite. This is not a big deal, just a minor enhancement for keeping the best possible water quality at your campsite. It also dilutes the graywater maximally for fastest biodegradation.
Note: I don't worry much about graywater overboard, even with dish soap or shampoo in it. The lake is huge, fish eat the food scraps, etc. We do prefer to wipe out and trash heavy grease or sauce rather than sending it overboard. But on the whole I'm more concerned about gas, oil, and sewage leaks than about rapidly biodegradable tidbits.
Obligatory tip of the hat here to the Glen Canyon Institute, which would like to drain "Lake Foul"... I'm a houseboat owner and also a member of the Southern Utah Wilderness Alliance, the Nature Conservancy, etc. If the dam were to be built today I would adamantly oppose it. But what's done is done, and the lake we humans have created is beautiful, spectacular, and special in its own right. Calling it foul is mere propaganda, as most of the time in most of the places it's clean and pretty, or at least most of the flotsam comes from natural sources. Yes, people do lose or jettison trash overboard, this bugs me too, but that's just how some people are, they mess up anywhere they visit. Delete the dam and there will be less trash directly in proportion to the fewer people enjoying the canyon.
The generator draws fuel directly from an engine tank. (This might change in 2007.) You can start it either on the lower right of the downstairs helm, or by using the switch under the front cover of the generator box. In any case hold down the start switch until the light comes on or you are sure the generator is running, unless it fails to start after 5-10 seconds, in which case let go and try again.
Run the generator whenever the battery voltage is unacceptably low, say under 11.5 V, especially before going to bed for the night. Also run it when using high-draw appliances such as the microwave, vacuum cleaner, or front fuel pump... The inverter can handle them but the batteries drop quickly.
We like to plan ahead if possible and run the generator while the boat is moving, rather than noising up our campsite after mooring for the night. If we have neighbors they also appreciate this, in fact sometimes they float across the lake on inner tubes bearing gifts for us to thank us for being such considerate chaps.
The transducer is under the helm. The unit reads a foot or two less than reality, at least in shallow water. If the display flashes it means no good signal is being returned. In particular this happens if the transducer hinges up so it's no longer level, or if it gets coated with scum (algae). This is easy to fix by wading under the front of the boat. (In November, however, you get about two minutes of working time, then you are a popsicle.)
The depth finder display has low-depth and high-depth alarms, but I don't find them very useful since they are hard to turn on and off. Besides, the canyon underwater is as rugged as the landscape out of the water and a depth alarm is not very useful. Far better to learn how to anticipate hazards and avoid them. Note: Polarized sunglass lenses often help you see "into" the water.
There's a steerable spotlight on the roof. The controls are lower left of the downstairs helm. This is very handy at times, such as for checking anchors on a dark, windy night.
There are also docking lights if you need them. The switch is on the helm.
The downstairs XM/CD player requires the "ACC" switch turned on at the helm. The roof CD player is always on, there's no power switch I can find.
Keep it set to "U", not "I". Reset this by holding down the button labeled U/I for three seconds. (New replacement radio does not work the same way?)
Of course channel 16 is the emergency and calling channel. Don't expect to raise anyone if you are well down the lake in a side canyon, it's mostly line-of-sight with some extra credit for reflections. Bullfrog Executive Services is on channel 10. Fuel docks are on channel 9. We like to use channel 88 ourselves as a fairly "private channel" between the houseboat and ski boats, etc. You can get weather forecasts on channel 01 or using the WX button.
Note: "Bullfrog Central" monitors channel 16 and airplane UNICOM from their office behind the front desk at the Defiance House Lodge up on the hill overlooking the boat ramp.
There's a lock box on the back deck with a back door key. Ask another owner for the combination.
There's a hidden kill switch for the front deck (toy tank) fuel pump. Ask another owner for the location.
Upright vacuum cleaner bags are type Z if you want to buy some. Beware sucking up wet stuff, we had to replace a half-full bag once because the bottom had rotted open (what a mess).
When storing brooms in the back closet please turn them upside down so the bristles don't get mangled. Note: It's OK to "hose off" the front and rear porches using a bucket of lakewater.
The metal awning on the Wildwind II is strong enough to support the weight of one person. Just so you know it's possible (and it's a pretty cool option too), be aware that you can hang a "Boulder Sky Chair" or equivalent from the permanent hook I installed under the awning. Beware, though, letting boat motion get you swinging too violently -- when in doubt put your feet down! Also it's a good idea to tie the chair's hooks to the roof trusses as a safety so it can't blow overboard, and to set a bucket of rocks in the chair when it's not in use. (The boat is called "Wildwind" for good reason... grin)
Some people like to build up a gray leathery tan during a week at the lake. Others ignore the subject and fry like lobsters (boil like chickens?) Wise folk realize that the sun is brutally intense most days at the lake, so they bring and imbibe plenty of sunscreen. Or smear it on your tender parts, whatever works for you.
After-sun products like aloe are good too.
An old river rat taught me the joys of light-weight, long-sleeve white cotton shirts and pants. You can buy them cheap at thrift stores. I sometimes wear them for hiking, more often when out for hours sailing or even swimming.
The geology of Glen Canyon is relatively simple but still fascinating. The various layers have warped up and down somewhat but are still fairly consistent and "readable". It's worth investing in boating charts that include a geologic column page (I like the Browns' boating charts, but apparently they might be out of print) and getting familiar with the layers mostly seen at the lake, from top down:
I just remember "ENKWC" for what I mostly visit.
One reason for laying this out is to call to your attention a subtle fact it took me years to notice. There are folds (anticlines and synclines) along the course of the Colorado River, and they affect the nature of the lake in many ways that you can learn to "read" and predict.
For example, where the Navajo sandstone is at lake level you get impressive sheer walls (like Iceberg Canyon) and often "no exit", nor even anchoring, depending on lake level. Where the land is uplifted enough to expose the Chinle you get a wider section -- Good Hope Bay, Rincon, Cha Canyon bay, Piute Canyon bay -- often ringed by shallow mud!
Where there's Chinle there is mud, vegetation, and more gnats! This doesn't mean you should avoid the wider bays. The trick is to look for sandstone rockfalls from above that have "iced" over the mudstone to create sandy beaches, big anchor stones, deeper water, etc.
Lake Powell is blessedly free from mosquitos. Thank the bats and the fishes. I never bother with repellent and I average one mosquito bite a week.
However, Glen Canyon does host bazillions of tiny little gnats that are attracted to light at night. We've learned to sit inside while leaving an outside light on to draw them away, etc. They are mildly annoying at times, but harmless. Usually but not always they are thickest in muddy and/or heavily vegetated areas.
My impression is that after a drought there are fewer bats. Perhaps this is because there are fewer tinajas (temporary standing pools of water in the slickrock) to support bugs that the bats eat?
We pay several thousand dollars a year to the Park Service monopoly concessionaire, ARAMark, to rent our buoy (and covered slips are even more expensive). For this cost we get the privilege of paying about $1/gallon more than land prices for gas at the fuel dock, along with other valuable services (only half kidding).
In particular be aware that if you arrive at the lake without a car, say by flying in, you can call on UNICOM to get a free land shuttle ride around the marina. And if you arrive without a boat while the houseboat is on the buoy, you can ask at the rental dock for a free water shuttle ride out. Upon return you can call on marine channel 16 to request a ride in.
These services are free but the operators appreciate tips on the order of $5/leg.
Well that's that... Keep the pointy end forward and the wet side down!